In our Xi’an facility, we see how skipping final checks leads to frustration. We ensure every unit is field-ready so you avoid costly downtime upon delivery.
You must focus on the structural integrity of the frame and arms, the precision of the spraying system including pumps and nozzles, the health of propulsion components like motors and batteries, and the stability of flight software and remote control signals to ensure safe operation.
Let’s examine the critical checkpoints we use to guarantee quality before any drone leaves our loading dock.
How do I verify the flow rate and nozzle performance of the spraying system?
A clogged nozzle can ruin a crop cycle. In our testing lab, we run rigorous wet tests to confirm pressure accuracy before any unit is packed.
You verify performance by running a wet test with water to check for uniform spray patterns and leaks at connectors. Compare the digital flow meter readings against the actual volume sprayed into a calibrated beaker to ensure the application rate is accurate and consistent.

When we finalize a drone for export to the US or Europe, the spraying system is the first place we look. This system defines the value of an agricultural drone. If it drips, leaks, or sprays unevenly, the machine fails its purpose. You need to simulate a real operation. Do not rely on dry runs. The pump must work with liquid to show its true colors.
The Wet Test Procedure
We always fill the tank with clean water for this test. You should start the pump and let it run at 50% pressure. Watch the nozzles closely. The spray should be a fine mist, not a heavy stream. If you see streaks or gaps in the mist, the nozzle tip might have a manufacturing defect or debris.
Next, increase the pressure to 100%. Check the hose connections. The high pressure often exposes weak O-rings or loose clamps. If you see water dripping from a joint, that joint will fail under the vibration of flight. We tighten every clamp with a torque tool to prevent this.
Calibrating the Flow Meter
The flow meter is the brain of the spray system. It tells the flight controller how much liquid is leaving the tank. We often find that new sensors need calibration. You can do this by spraying a set amount, say 2 liters, into a measuring container.
Check the drone's app or remote controller screen. It should read exactly 2 liters. If it reads 1.8 liters or 2.2 liters, the calibration is off. This error leads to over-spraying or under-spraying crops. In precision agriculture, this margin of error is unacceptable. In precision agriculture 1
Chemical Resistance Check
Not all seals handle chemicals well. We use specific rubber compounds for our gaskets. You should verify that the seals in your unit are rated for the pesticides you plan to use. pesticides you plan to use 2 Standard rubber can swell or crack after exposure to harsh agrochemicals.
Troubleshooting Flow Issues
Here is a guide to common flow problems we identify during inspections and how we solve them.
| Symptom | Potential Cause | Inspection Action |
|---|---|---|
| Uneven Spray Pattern | Clogged filter or nozzle tip | Remove tip, clean mesh filter, and re-test. |
| Leaking at Joints | Worn O-ring or loose clamp | Inspect O-ring for cuts; tighten clamp to spec. |
| Inaccurate Flow Data | Uncalibrated flow meter | Perform volumetric test and adjust software offset. |
| Pump Pulsing | Air in the lines | Run pump at max speed to purge air bubbles. |
| Low Pressure | Kinked hose | Trace hose path and straighten any bends. |
How do I test the battery endurance and motor stability under full load?
Power failure mid-flight is a nightmare scenario. Our engineers stress-test every motor to ensure they handle heat and heavy payloads without faltering during operation.
Test battery endurance by hovering the drone with a full payload until the low-voltage warning triggers, ensuring cell voltages remain balanced. For motors, listen for irregular grinding noises during spin-up and use an infrared thermometer to check for overheating after the flight.

The propulsion system is the heart of the drone. In our experience, static bench tests are not enough. You must see how the power system behaves when the drone is fighting gravity. A motor might spin fine without a propeller, but it could overheat once it has to lift 40 kilograms.
The Full Load Hover Test
We load the drone tank to its maximum capacity with water. Then, we hover the drone at a safe height, usually 2 to 3 meters. We keep it there until the battery reaches 20%. This stress test reveals weak links. If a motor has a bad bearing, it will get very hot or make a screeching noise under this load.
You should listen carefully. A healthy drone creates a steady "hum." A drone with issues will have an oscillating sound. This wavering sound often means the Electronic Speed Controller (ESC) is struggling to manage the current Elektronischer Drehzahlregler (ESC) 3.
Battery Cell Balancing
Batteries are expensive and volatile. A "full charge" reading on the screen is not the whole story. You must look at the voltage of each individual cell. In a 12-cell battery pack, every cell should be within 0.05 volts of each other.
If one cell drops significantly lower than the others during the hover test, that battery is defective. It will cause a sudden voltage drop in flight, leading to a crash. We reject any battery pack that shows this imbalance on our production line.
ESC Thermal Inspection
After the drone lands, immediate action is required. We use a thermal camera or an infrared thermometer to check the motors and ESCs. They should be warm, but not too hot to touch. If one motor is 20 degrees hotter than the others, it is working too hard.
This friction usually comes from internal resistance or a tight bearing. If you ignore this heat now, the motor will burn out in the middle of a field later.
Power System Health Indicators
Use this table to judge the health of the propulsion system during your ground and hover tests.
| Komponente | Healthy Indicator | Warnzeichen | Erforderliche Maßnahmen |
|---|---|---|---|
| Motor Sound | Smooth, steady hum | Grinding, clicking, or oscillation | Replace motor bearings or entire unit. |
| Motor Temp | Warm (40-60°C) | Hot (>80°C) or smelling of burnt wire | Inspect for friction or ESC fault. |
| Battery Cells | Voltage diff < 0.05V | Voltage diff > 0.1V under load | Mark battery as unsafe; do not use. |
| Connectors | Clean, tight fit | Black marks (arcing), loose fit | Replace plugs; check soldering. |
| Propeller | No vibration | Visible tip wobble | Balance or replace propeller blades. |
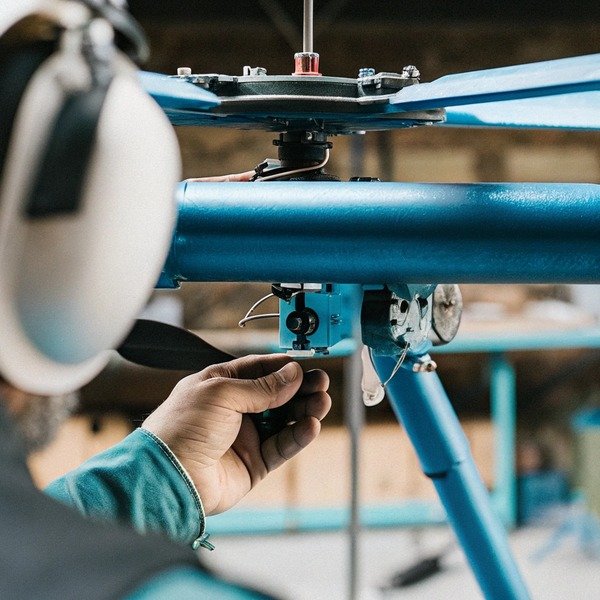
What structural defects should I look for in the frame and folding arms?
A cracked arm guarantees a crash. We inspect every carbon fiber joint under bright lights to catch microscopic fractures before shipping any order.
Inspect the carbon fiber arms and folding mechanisms for hairline cracks carbon fiber arms 4, delamination, or loose screws that compromise rigidity. Check that the locking mechanisms engage fully without play and ensure the landing gear is square and secure to prevent tipping during takeoff or landing.

Structural integrity is non-negotiable. Agricultural drones endure rough transport and hard landings. If the frame is weak, the vibration from the heavy motors will tear it apart. We treat the frame inspection like an aircraft safety check.
Carbon Fiber Inspection
Carbon fiber is strong but brittle. We look for white lines on the black tubes. These lines indicate delamination or stress cracks. delamination 5 You usually find them near the motor mounts or the folding joints. These are high-stress areas.
Run your fingers along the arms. If you feel rough patches or splinters, the structural integrity is compromised. Even a small crack can propagate quickly when the drone is carrying a full tank of liquid.
The Folding Mechanism
Most ag drones fold up to fit in trucks. Most ag drones fold up 6 This convenience introduces a weak point: the joint. We open and close the arms multiple times. The movement should be smooth but firm. When the arm is locked in the flight position, there should be zero "play" or wiggle.
If the arm wobbles even a millimeter, the flight controller will fight to keep the drone stable. This wastes battery and causes erratic flight. We adjust the tension screws on the locking clips until the arm is rock solid.
Fastener Security
A drone has hundreds of screws. Vibration loosens them. We use thread-locking fluid (like Loctite) on critical metal-to-metal screws. thread-locking fluid 7 You should check the screws on the landing gear and motor mounts. Use a torque driver if available.
If you find a loose screw, do not just tighten it. Check if the thread is stripped. A stripped screw hole in a plastic or aluminum part is a major defect. It means the part must be replaced, not just patched up.
Landing Gear alignment
Place the drone on a flat, level surface. It should sit perfectly flat. If it rocks back and forth like a wobbly table, the landing gear is bent or installed incorrectly. Bent landing gear can cause the drone to tip over during landing, especially if the tank is half-full and the liquid sloshes around.
Structural Checklist
| Part | Was zu beachten ist | Warum es wichtig ist |
|---|---|---|
| Arm Tubes | Cracks, white stress lines | Prevents mid-air arm failure. |
| Folding Joint | Wiggle/Play when locked | Ensures flight stability and sensor accuracy. |
| Motor Mounts | Cracks around screw holes | Keeps the motor attached under high thrust. |
| Fahrwerk | Bending, loose T-joints | Prevents tipping during uneven field landings. |
| Tank Mount | Secure straps/brackets | Stops load shifting which confuses the autopilot. |
How do I check the remote control signal and flight software stability?
Hardware is useless without reliable software. We update firmware and test signal strength in high-interference zones to guarantee a solid link for every pilot.
Check signal stability by performing a range test and verifying the telemetry link remains strong without latency. Ensure the flight controller firmware is up to date and test fail-safe functions like Return-to-Home to confirm the software reacts correctly functions like Return-to-Home 8 to signal loss.

The invisible connection between the pilot and the machine is vital. In our export process, we often find that region settings can mess up the signal. A drone set to Chinese radio frequencies might not connect well in the US. radio frequencies 9 We verify these settings before the box is sealed.
Firmware Consistency
Before you fly, check the "About" page in the app. The remote controller, the drone, and the spraying system often have separate firmware versions. They must all match or be compatible. Mismatched firmware causes "bugs" like the pump not responding to the spray switch.
We always flash the latest stable version. We avoid "beta" versions for agricultural work. Stability is more important than new experimental features. You should verify that the version installed matches the manufacturer's latest stable release note.
Control Stick Calibration
The sticks on the remote need to be centered perfectly. In the calibration menu, when you let go of the sticks, they should read "0". If they read "5%" or "-3%", the drone will drift. It will think you are telling it to move when you are not.
We perform a stick calibration on every unit. It takes two minutes but prevents crashes. You should also check the switches and buttons. Toggle the spray switch and the flight mode switch. The response on the screen should be instant.
Failsafe Testing
This is the most important safety test. What happens if the remote dies? We simulate this safely. With the drone hovering low (without props if doing a bench test, or low altitude if flying), we turn off the remote controller.
The drone should immediately enter "Failsafe Mode." Usually, this means it stops, hovers for a few seconds, and then ascends to a return height and flies back to the takeoff point. If the drone just drifts with the wind, the failsafe is not set correctly. This is a critical failure in our QC protocol.
Sensor Interference Check
Agricultural environments have pumps, power lines, and metal structures. The compass is sensitive to this. The compass is sensitive 10 We check the interference values in the app. The compass arrows should be green. If they are red or yellow while the drone is in an open field, the compass module might be magnetized. We demagnetize it and recalibrate. A bad compass leads to the dreaded "toilet bowl effect" where the drone spins in circles.
Software & Signal Verification Logic
| Merkmal | Test Method | Kriterien für das Bestehen |
|---|---|---|
| Stick Response | Move sticks to limits in app view | Reads 100% at limit, 0% at center. |
| Map Loading | Connect controller to WiFi | Local maps load quickly and cache correctly. |
| Signal Strength | Walk 50m away (ground test) | Signal bars remain full; no video lag. |
| Rückkehr nach Hause | Turn off remote controller | Drone initiates return sequence within 3 seconds. |
| Spray Control | Toggle spray switch | Pump activates instantly; icon changes on screen. |
Schlussfolgerung
A thorough pre-shipment inspection is the only way to ensure your agricultural drone is an asset, not a liability. By systematically checking the spray system, power train, frame, and software, you protect your investment. We prioritize these tests daily because we know that in farming, reliability is everything.
Fußnoten
1. FAO resources on the implementation of digital and precision agriculture technologies. ︎
2. Official EPA guidance on pesticide safety and chemical regulations. ︎
3. Authoritative technical reference explaining the function and failure modes of speed controllers. ︎
4. General background on the material properties of carbon fiber in aerospace applications. ︎
5. Official FAA guidance on detecting delamination defects in composite aircraft structures. ︎
6. Official UK aviation authority guidance on drone categories and operational safety. ︎
7. Official documentation from the industry leader on thread-locker application and properties. ︎
8. Manufacturer documentation on standard safety features and flight safety protocols. ︎
9. Official US government resource detailing radio spectrum allocations and regional compliance. ︎
10. Technical explanation of magnetometer sensors used in drone navigation systems. ︎